Tuesday 14 February 2017

'Love You' card using Woodware 'Lovebirds' stamp set & Koi Brush Markers.

Welcome back & Happy Valentine's Day!.
Thank you for visiting my crafty little blog. Today I'd like to share a 'Love' inspired project made using the Woodware 'Lovebirds' stamp set.


The 'Lovebirds' were stamped in clear versamark ink onto watercolour paper & heat embossed with white embossing powder.
Next I coloured/painted the birds using various colours of Koi brush markers, water & a paint brush.
I used blues & greens of the same pens,water & a large, flat paint brush to create a colour wash for the background. The flowers from the same stamp set were second generation stamped randomly over the background with Peacock Feathers Distress Ink.


The 'Love'  & 'You' are from a stamp set by Wow! Embossing powders.
These were stamped in Picked Raspberry Distress Ink onto water colour card, cut out, distressed around the edges & mounted onto lilac card & then onto the background, one above each bird.


To finish, I added some polka dot lilac ribbon across the bottom of the card.

Thanks for stopping by, please pop by again soon to see some more of my crafty little projects.

Amy x 

Monday 13 February 2017

Being unique is better than being perfect - Box canvas using Woodware stamps & Wow! Embossing powders.

Welcome back to my crafty little blog.
Today I'd like to share with you another decorated canvas design.
This was a project we made at my shop Out Of The Blue in Chipping Sodbury near Bristol.
We teach workshops twice a month & try to add some different projects other than just card making.


Like the last canvas project I posted recently, this is made by using the reverse of the canvas. 
As our workshops are only 2 hours long, to save time I prepped everyone's blank canvas using turquoise acrylic paint.
We then spread texture paste through a Creative Expressions mask & once removed sprinkled glittery Wow embossing powder over the wet paste & heated with a heat tool until the paste bubbles & adds more texture.
The effect is lovely & also means the paste dries pretty quickly. Another time saver!.
Clear Versamark ink was dabbed around the edges of the canvas & heat embossed with the same powder.


We stamped the Woodware Whimsical Flower onto watercolour paper & coloured/painted the flowers with Koi brush marker pens.
The flowers were cut out & layered up leaving some areas unglued for shaping & to add dimension.
The flower was glued in place to the left side of the front of the canvas box.

Next, we created the sentiment to place in the recess of the box frame using another clear stamp set from Woodware.
Mini flowers were added & distress ink was blended around the edges.


The choice was given to add ribbon to the back to hang on the wall, but I think this canvas looks better just stood on a shelf as it is.
Just a few touches of Stickles glitter glue were all that was needed to finish.

As it's Valentine's Day tomorrow I'll be posting again tomorrow with a love themed card so please come back to take a look.

As always, your comments are much appreciated.

Amy x

Tuesday 31 January 2017

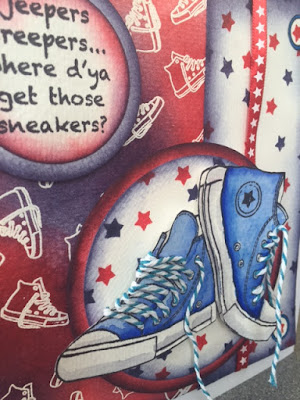
Jeepers Creepers! Woodware sneaker card.

Welcome back to my crafty little blog.
Today I'm sharing a card design we made at our card making workshop at my shop Out Of The Blue in Chipping Sodbury near Bristol.
This card design went down very well with our craft ladies. They said it would be perfect when they find it hard to come up with a card for a male or someone of that 'inbetween' age.

For this card we used the Jeepers Creepers Sneaker stamp set from Woodware.


The main sneaker image was stamped twice in black ink & heat embossed onto watercolour card & then coloured with koi brush markers.
The images were cut out & holes created to thread twine through for the laces.
One sneaker was layered with 3 d foam onto the other.


The backgrounds were created with the background sneaker stamp & the other stamps in the Jeepers Creepers set.
The sneakers were raised up onto die cut circles along with the sentiment.


Thanks for visiting my blog.
Please leave me a comment & pop back again soon.

Amy x

Sunday 29 January 2017

Friends are flowers in the garden of life canvas. Paperartsy JOFY stamp set 42

Hello & welcome back to my crafty little blog.
It's been a while since I last posted a project, so today I'm going to catch up a bit by sharing a canvas I made for my friend for her 40th Birthday.
We're both really busy & struggle to find the time to meet up very often so as well as this little gift we went on a spa day!.
It was a lovely relaxing treat with no kids to worry about & we felt really chilled at the end of the day.

Here's the canvas:


I decided to use the Paperartsy JOFY stamp set 42.
 It has the sentiment 'Friends are flowers in the garden of life'.

 I used a 6 x 6 deep edge square box canvas blank & painted it with Paperartsy fresco finish paint which dries quickly with a lovely, even, chalky finish.
I also painted the inside of the back of the canvas as this was going to now be the front!.

I cut some strips of turquoise card to fit the front panels of the box frame & using black ink stamped the loopy edging design across the top & bottom, filling the loops with lilac paint
I used the foliage down both edges & painted those & on a seperate piece of white card stamped the small flower & leaves which I coloured with promarkers.


I stamped the girl twice & coloured both girls with promarkers alternating the colours to match in with my background & flowers.
I cut them out & cut the legs & hair bun off of one of the girls.
I repositioned the hair bun & legs so that the front girl is shorter than her friend & has a different hairstyle.
They were then glued into place on the front of the canvas, one in front of the other.
I stamped & coloured the sentiment onto white card, added some flowers & blended around the edges with distress ink.
This was then glued into the back recess of the box canvas.


I then printed a personalised message onto card & glued it into place on the back of my box canvas along with some polka dot ribbon to hang it with.


Thanks for visiting.
Enjoy the rest of your Sunday & I'll be back again very soon with another project to share.

Amy x

Wednesday 31 August 2016

Pick a Daisy card ,Paperartsy Eclectica Lin Brown set 26

Hello again everyone.
 Hope you enjoyed the Bank Holiday weekend & managed to get some crafting done?.
 Other than working in the shop on Saturday I had a relaxing weekend & made this card for my Mother in law who is celebrating a big birthday tomorrow. Not saying how old though as she's not keen to broadcast it & after all, age is just a number, as my husband wrote inside.


Here's the card I made using Papersrtsy Eclectica Lin Brown 26 stamp set & stencil 024.
As I wasn't incorporating a number on the card I thought it fitting to use Daisies as my theme because
 my daughter ( her Granddaughter) is called Daisy.
I created the background with a colour wash using Koi Brush Marker pens on watercolour card.
I mixed some green mica powder with pearlescent texture paste & applied it through the stencil & then heated with a heat tool once the stencil was removed. 
This added more texture for my background which I stamped with the foliage & open Daisy from the stamp set using Peacock Feathers & Dusty Concord distress inks,


I stamped the main Daisy twice with black memento ink onto white card & coloured with the same colour Koi Brush markers as I used for the background.
I cut these out & layered the head on top of the base Daisy, curling the petals & leaves to add dimension.
I added the stamped sentiment, cut into segments & finished the card with stickles glitter glues & liquid pearls to match the colour scheme.

Off to bed now, I'm feeling rather full after we took the birthday girl out for a vintage tea party this afternoon. We filled up on lots of yummy tea,cake & sandwiches!.

Thanks for stopping by, please leave me a comment if you can.

See you again soon

Amy x 

Saturday 27 August 2016

You're The Bee's Knees canvas. Paperartsy JOFY stamp set 30.

Hi Everyone, it's been a while since my last post but I've been busy crafting & have lots to share.
First, as it's nearly back to school time, I thought I'd share the projects I made with my little girl for her to give as thank you gifts thank you to her teachers before breaking up for the school holidays.

The school have been teaching the children about Bees, their habitat, their importance in our lives & how they contribute to the food chain. So what better theme to use for teachers gifts?!.

I love JOFY stamps from Paperartsy & immediately thought of  JOFY stamp set 30 to use for this project. 

Here's what we made:


A canvas that says ' You're the bees knees'.

The canvas base  was painted with Paperartsy fresco finish paint, stencilled with flowers & fresco finish paint using JOFY stencil 007, then stamped with the honeycomb design from the set using white paint.

With the background completed, we stamped flowers from JOFY stamp set 13, the large & small bumble bees, hexagon with sentiment in the centre, & two bee hives. 
These were all coloured using Koi brush marker pens.


We cut the layers of one of the hives & glued over the top over the other hive to create 3d flaps.
We stuck everything into place adding twisted wire to the large bumble bee to make it appear like it's flying out from the hive.


All the bees were given a touch of sparkle with yellow Stckles glitter glue & their wings had a coat of Glossy Accents.

Daisy wrote a personal message on co-ordinating coloured card stock which we stuck to the back of the canvas adding some ribbon for hangng in between the two layers.

We then made a matching gift bag to pop the canvas in along with a Burt's Bees mini gift set.


We loved using this stamp set I have more projects made with it to show you soon.

Thanks for stopping by

Amy x 

Friday 25 March 2016

Easter Treat Box made with Inky Doodles stamps.

Hello again, thanks for coming back to visit my blog.
Today I'm sharing another Easter project that we made at one of our Out Of The Blue paper craft workshops recently.
We have started stocking Inky Doodles stamps in the shop & the Spring Applique set was perfect for this project - an exploding box with a treat inside!.


So, we started by cutting & scoring a box shape & lid.
Square pieces of card were cut to fit each panel & then these were decorated with the stamped & coloured bunnies, hens, sheep, chicks etc.
These were all coloured with promarkers & extra colour was added with blended distress inks.

The chocolate Lindt bunny is sat within a strip of card decorated with flowers. To stop him rattling around once the box is shut he is held in place with a sticky dot.


The perfect little treat for Easter!.


Hope you have lots of treats lined up this Easter.
Please pop back again soon for more Spring project ideas.

Amy x