Monday, 29 December 2014

Cool Christmas

Well I hope you've all been enjoying the festivities over the past week?.
It's been a busy time in the shop as you would expect at this time of year & we worked right up until 4 on Christmas Eve.
 So, its been really lovely to have a few days off & enjoy some time with family & friends before we started back today ready for our Winter Sale.

I'm sharing the Christmas card I made for my sister & her boyfriend. She's got a thing about Polar bears & when I saw this stamp from Woodware I just had to have it to make their card.
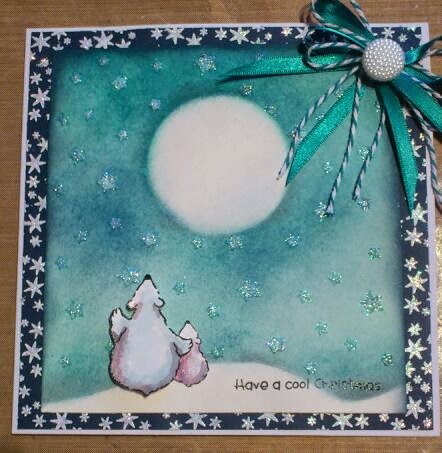

I cut a circle for the moon & a wavy strip for the snowy hills from cardboard & used these as masks around which I blended distress inks to form the sky background.
I left these in place & then placed the stars stencil from Imagination crafts over the top & spread diamond Sparkle medium also from Imagination crafts through the stencil.
Once dry, I stamped the Cool Christmas sentiment from the Woodware stamp set in the bottom right corner & added my Polar bears that had been coloured with a paintbrush & distress inks.


I created the border by stamping stars with perfect medium & then heat embossed with white detail embossing powder onto navy card.
To finish I added a bow made with ribbon & bakers twine, a pearl button & some crystal stickles glitter glue.


Hope you all have a great New Year & I wish you all a very happy 2015!.

See you again soon

Amy x 

Monday, 22 December 2014

Imagination Crafts tutorial sneaky peek!

Hi all, hope you had a good weekend?.

I'm finally feeling a bit more festive, just as well with the big day only a few days away now!.
Still lots of dashing about to do but I'm ticking things off my list daily.


Today I'm showing a sneaky peek of my first tutorial project for the Imagination Crafts blog.


Please pop on over to see what I made & the full tutorial.
It would be lovely if you could leave a moment too! :-)

Thanks for looking

Amy x 

Monday, 15 December 2014

Imagination Crafts Inspiration. Sparkle & Shine.

Welcome back, today it's time for me to share another inspiration project with you for Imagination Crafts.
Every month there is a new challenge over on the Imagination Crafts Challenge blog with an 'anything goes' theme.
Please pop on over & check out all the other Design team inspiration projects & it would be great if you joined in with the challenge too.


My card today was made using the Tile Petal stencil.
I secured the stencil to a piece of white card stock & used a Pigma Micron fine liner pen to draw around the stencil.
I then filled in the design with the same pens creating my own kind of Zentangle within the spaces.
I drew round just the flower petals on another piece of card, zentangled within them & cut them out.
I then covered the whole design & the separate petals with double sided clear adhesive sheet & applied cosmic shimmer glitter jewels all over. This created a super sparkly effect & makes the surface all twinkly!.


I shaped the separate petals & glued them over the top of the original petals to add a bit of dimension to my card.

I then finished with some black flat backed pearls in the centre of the flower plus some frosted white gems around the outside too.

That's it for today. Hope I've inspired you to join in the challenge.

Back again soon.

Amy x 

Thursday, 11 December 2014

Dinkie Snowman pop up card

Welcome again blogger friends.

Thank you all for your birthday wishes, I really enjoyed my birthday although it all passed by so quickly & now I'm trying to concentrate on Christmas.

I was so excited to find that I had won the Visible Image November Challenge with my Butterfly pop up box card!
My first ever blog challenge win! :-) .

I've already spent my £20 prize on the Visible Image website & am eagerly awaiting the arrival of my goodies in the post.

In celebration, I thought I would share another pop up box card with you today.
This time it features stamps from Indigoblu.


Here I have used the Snowman dinkie, I wish you a merry Christmas dinkie & the A6 baubles flourish stamps.


Once constructed, the box card panels were decorated with the stamped images coloured with peacock feathers & faded jeans distress inks.
My snowman was stamped in black ink & coloured with promarkers. 
The snowflakes were fussy cut from the baubles flourish stamp & stuck onto clear acetate stalks to look as if they were falling snow.


I also added some snowflakes made with spellbinders & some touches of stickles glitter glue here & there for some added sparkle.
This all folds flat enough to fit inside an envelope ready to post or give to your recipient.

Thanks for looking, I'll be back again soon with some more Christmas makes.

Amy x 

Monday, 1 December 2014

Imagination Crafts Design Team Inspiration. Poppy fields

Hi all, I'm back today with my first design team post for Imagination Crafts.
Every month there is a new challenge over on the Imagination Crafts Challenge Blog with a great prize to spend in the  Imagination Crafts shop.
 So me & the rest of the design team have created some projects to hopefully inspire you to hop over & join in with the challenge.
For my inspirational project I've created a card using the Dragonfly & Poppies stencil & Inkadinks in Brights.


I attached the stencil to some white card & drew around the design with a pigma micron black fineliner pen to create an outline.
I then squeezed out small amounts of the red, yellow, orange & green inkadinks & watered them down to use as water colours to paint the dragonflies & poppies as above & used Distress Inks to blend in the background of the sky & field.
I then replaced the stencil & applied clear texture paste through it using a palette knife.
I removed the stencil & applied clear microbeads while the texture paste was still wet.


Once the texture paste has dried to clear, the colours of the inkadinks show through whilst the microbeads add texture & a lovely subtle sparkle.


I didn't really think that any more was needed to finish my card as there is quite a lot going on, so I just matted & layered my design onto red, black & then green card stock before fixing it to my white card blank.

 Make sure you pop over to the Imagination Crafts Challenge Blog to check out the fab creations by the rest of the design team & join in yourself.

Thanks again for stopping by.
 As always your comments are much appreciated & I'd also like to say a big Welcome to my newest followers, its great to have you here :-) .

Amy x 


Friday, 28 November 2014

Fabulous Forty!

Well, I must apologise for being abscent for a little while.
 But I think I have good reason, I've been celebrating my 40th birthday!. 
I've had a few days away here & there over the last week or so with family & friends & have been treated to some yummy meals out & gorgeous gifts. 
My best friend from school also celebrated her 40th birthday & my card today is the one that I made for her.


I cut the 40 with my cricut machine out of pale blue card. I then colour washed the numbers with some Lilac heaven & Blueberry ice Inkadinks that I received in the post along with lots of other gorgeous goodies from Imagination Crafts.
I've really enjoyed working with these inks & I'm looking forward to sharing some more projects that I've made using them as part of my new Design Team role for Imagination Crafts.

I also created my background with the two colours of inks & then spritzed the numbers & background with watered down mica powders to add shimmer. Unfortunately, the camera doesn't pick this up very well.
I then used Heartfelt Creations Sun Kissed Fleur Swirls stamps & stamped it randomly over the background with Dusty Concorde distress ink. Once dry,  I removed some of the colour from the centre of the flowers by brushing with water & then blotting with kitchen paper.


After trimming the background to fit my card blank, I stamped & cut more flowers from the offcuts, shaped them & added some turquoise micro beads to the centres.
My sentiment is also from Imagination Crafts.


I used all the same colours for the inside of the card plus a Phill Martin sentiment stamp to finish.


I hope you like the finished card.
Thanks for stopping by, I'll be back again soon.

Amy x 

Tuesday, 11 November 2014

Flutterby Butterfly

Hello & welcome back.
 Phew! What a busy week its turning out to be.
 This week we are hosting our annual Christmas Shopping Evenings at Out Of The Blue, with last night being the first of the 3 evenings. 
I was kept very busy running up & down the stairs, topping up items that had sold, chatting to our loyal customers & handing out festive drinks & nibbles.
Looking forward very much to the next 2 nights which are no doubt going to be just as busy, so I thought I'd grab these few spare moments to share my card with you.

It's a pop up box card that my half of our workshop group made a little while back using Visible Image  stamps.
Visible image design & make all their own clear stamps so if you're not familiar with them, please check out their fab products, some of which we are very pleased to stock in our shop.


I've used 4 stamps by Visible Image, Large Butterfly, Butterfly, Butterfly Sentiment & Tall Grass.

I used a template to create the base box card out of a sheet of A4 cream card. There are lots of instructions on how to construct pop up boxes of varying sizes available on YouTube etc.
 Once constructed & decorated the card folds flat enough to fit inside an envelope.
 I created my own background paper by making a piece of A4 card wet & then using Cosmic Shimmer Water Paint Garden Tones set & applying the various colours in patches.
Once dry the background has a beautiful shimmer to it.
I then stamped the 2 sizes of butterfly stamps randomly with distress inks that toned in with the shimmer paint.
The A4 background card was then cut into panels, mat onto lilac card & applied to the panels on my base box.


I stamped & embossed 3 large butterflies & 4 small butterflies & painted them with the same Cosmic Shimmer paints & cut them out.
I added distress glitter to the butterflies & made antennae from craft wire with tiny beads on the ends.
I stamped & embossed the Tall Grass onto lilac card several times & then cut around it & glued it inside the inner supports inside the box & onto the back panel.
The butterflies on acetate were then glued in & around the grass so they appear to be fluttering .


I stamped the Butterfly sentiment on to the offcuts of my background sheet & chopped it up, attaching it to the very front panel with 3D foam pads.


It was great fun making this card & although it was maybe a little time consuming to complete within the 2 hour workshop timescale, many of our class members came back to show more pop up cards they had then made at home based on this design.
These butterfly stamps are some of my favourite stamps to use & are great for lots of occasions.

I'd like to enter this card in the Visible Image November Challenge.

Thanks for visiting
See you soon

Amy x