Showing posts with label handmade Christmas cards. Show all posts

Monday, 29 December 2014

Cool Christmas

Well I hope you've all been enjoying the festivities over the past week?.
It's been a busy time in the shop as you would expect at this time of year & we worked right up until 4 on Christmas Eve.
 So, its been really lovely to have a few days off & enjoy some time with family & friends before we started back today ready for our Winter Sale.

I'm sharing the Christmas card I made for my sister & her boyfriend. She's got a thing about Polar bears & when I saw this stamp from Woodware I just had to have it to make their card.
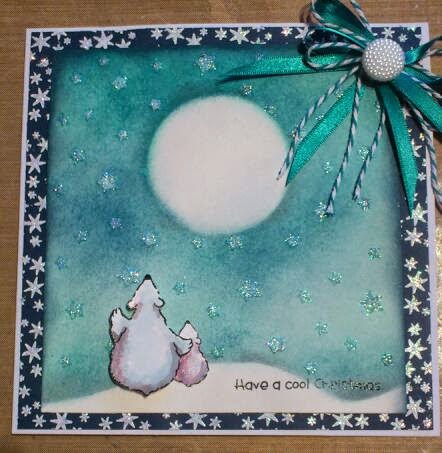

I cut a circle for the moon & a wavy strip for the snowy hills from cardboard & used these as masks around which I blended distress inks to form the sky background.
I left these in place & then placed the stars stencil from Imagination crafts over the top & spread diamond Sparkle medium also from Imagination crafts through the stencil.
Once dry, I stamped the Cool Christmas sentiment from the Woodware stamp set in the bottom right corner & added my Polar bears that had been coloured with a paintbrush & distress inks.


I created the border by stamping stars with perfect medium & then heat embossed with white detail embossing powder onto navy card.
To finish I added a bow made with ribbon & bakers twine, a pearl button & some crystal stickles glitter glue.


Hope you all have a great New Year & I wish you all a very happy 2015!.

See you again soon

Amy x 

Monday, 3 November 2014

Exciting times!

Hello my friends, welcome back & welcome to my new followers too!.
Well, I have some exciting news to share with you today.
I recently saw that Imagination Crafts were looking for DT members & I decided to try my luck & apply.
Imagine my delight when I was offered one of the positions!!
So, as of the 1st December myself & the other design team members will be showcasing products from Imagination Crafts & bringing you some inspiring projects.
 I do hope you'll keep stopping by to see what we come up with.


So today I thought it appropriate to show you a card I have made using Imagination Crafts products.


I stamped the Decoupage Stamp Sets - Owls Border twice & coloured with promarkers.
I cut away the background in the middle of the design ready for my own created background to show through.
I then cut out the little owl & decoupaged it onto the main coloured image with 3d foam.
I die cut a silver scalloped frame for my owl image using a spellbinder.
Next I created my background by scraping diamond Sparkle Medium through the Random Stars background stencil.
Once dry I then added my owl image with 3d foam to give depth.


Finally, I matted & layered this onto vintage silver card to match the frame around my owls & then again onto navy card edged with blue dimensional paint dots.

Before I go I thought I would share some pics of the cake & other bits & bobs I made for my daughter's birthday this week.
She turned 5 & like most 5 year olds she is completely obsessed with all things to do with the Disney film Frozen.
So that was the theme of the party which we hosted for 20 children.
 Unfortunately, Daisy got chicken pox a couple of days before her birthday but after a trip to the doctor we were given the OK to go ahead with the party.


I'm pleased to report that the chicken pox seem to be on their way out,  just in time for her to go back to school!.

Thanks for stopping by, see you again soon.

Amy x 


Tuesday, 21 October 2014

Funky Christmas

Hi everyone!. I'd just like to say thank you for all the lovely comments you've all been leaving me recently, its much appreciated & I'm still working my way around catching up with what you've all been up to as well.
Also, a big hello & welcome to my new followers!
Thank you for following me & taking the time to visit.

Now, onto today's card.
It's one I made a while ago when I was trying to get into the swing of making Christmas cards.
It's 8 x 8 on a scalloped card blank & features 2 stamps from Indigoblu. 
Funky Circles Tree & Merry Christmas dinky.


As you can see, I've gone for the traditional red, green & gold Christmas colours.
I stamped the tree in Evergreen Bough distress ink onto white card & heat embossed with clear embossing powder.
I then cut around the tree & inked it with Festive Berries distress ink.
I stamped just the star at the top of the tree with flitter glue, applied gold gilding flake, cut it out & stuck it over the original star with 3d foam.
Next I stamped the Merry Christmas dinky with flitter glue onto red card & applied gold gilding flakes.
I then mat & layered this onto green card, the edges of which I'd lightly touched with glue & gilded.
I gilded the edge of some red card & attached the tree to the left with 3d foam & the sentiment to the right.


I stamped the funky tree around the edges of a piece of white card with flitter glue & once gilded inked with the red distress ink as before.
This was then mat & layered onto red & then green card & the whole lot was mounted onto the card blank.


The final touches are a gold organza ribbon bow & red, green & gold gems in the circles on the tree.

Right, I'm off to bed. A busy day tomorrow. Daisy has her first Harvest Festival in the morning & then its busy, busy pricing up several deliveries that arrived in the shop today.
Christmas is definitely on it's way!

Amy x 

Tuesday, 30 September 2014

Festive Tree

Well, I can't believe we are on the verge of October already & that its been so long since my last blog post!.
I must apologise for my absence & lack of commenting on your projects but its been quite a busy time.
Covering staff holidays, our own holiday, Hubby's 40th & our little Daisy starting school has meant not a lot of time for blogging I'm afraid,  plus we are now on the build up to Christmas in the shop with lots of ordering & deliveries to sort.

Anyway, I have managed to fit in a bit of crafting time recently, mainly playing around with ideas for our Out Of The Blue workshops. So hopefully I can get back into the swing of things & post a bit more regularly.

My card today was the result of playing around with some  Dreamweaver stencils ready for our October workshops.

We did one of our 1st Christmas workshops a couple of years ago using this Dreamweaver  tree stencil with embossing paste & mica powders so I thought I'd use it in a different way for this card.


I started by creating my background with alcohol inks on glossy white card stock. The technique I used was one I saw on  a youtube tutorial, there are quite a few videos on there showing this technique. 

I randomly dripped 2 different colours of alcohol inks ( in this case red & green ) all over a sheet of acetate. I then dripped blending solution randomly over the top to dilute the colours & allow them to spread out a bit more.

Next I put my glossy card face down on top of the colours & placed another sheet of acetate over the top to create a sandwich. I then pressed down & rubbed my hand over the acetate to spread the inks around & allow the glossy card to pick up the colours.
This creates a completely random, quick drying effect 

I cut down my background & used a snowflake background stencil, also from Dreamweaver & inked through it with festive berries & evergreen bough distress inks.

I off centred the tree to the right & spread black glossy embossing paste through it. I then left this to dry.


I stamped the Phill Martin Christmas sentiment on the offcut of my background, cut it out & backed it onto red card.
I die cut & layered my snowflake in red & green ( Spellbinder Snowfkake Wonder ) & added a black pearl to the centre.
I tied some red ribbon & added it to the left of the tree & attached the sentiment & snowflake near the top. 


To finish, I mat & layered onto red & green card & added red, green & gold stickles to the baubles & star at the top of the tree.

Well, thank you for taking a look, I hope you'll pop by again soon. 
I'm going to make a big effort over the next few days to stop by & catch up with what you've all been up to.

See you soon

Amy x