Showing posts with label Woodware stamps. Show all posts

Tuesday, 14 February 2017

'Love You' card using Woodware 'Lovebirds' stamp set & Koi Brush Markers.

Welcome back & Happy Valentine's Day!.
Thank you for visiting my crafty little blog. Today I'd like to share a 'Love' inspired project made using the Woodware 'Lovebirds' stamp set.


The 'Lovebirds' were stamped in clear versamark ink onto watercolour paper & heat embossed with white embossing powder.
Next I coloured/painted the birds using various colours of Koi brush markers, water & a paint brush.
I used blues & greens of the same pens,water & a large, flat paint brush to create a colour wash for the background. The flowers from the same stamp set were second generation stamped randomly over the background with Peacock Feathers Distress Ink.


The 'Love'  & 'You' are from a stamp set by Wow! Embossing powders.
These were stamped in Picked Raspberry Distress Ink onto water colour card, cut out, distressed around the edges & mounted onto lilac card & then onto the background, one above each bird.


To finish, I added some polka dot lilac ribbon across the bottom of the card.

Thanks for stopping by, please pop by again soon to see some more of my crafty little projects.

Amy x 

Saturday, 25 April 2015

Pop up card workshops April 2015

Hello blog friends!.
 Well, its been a busy time since my last post.
Lots of new goodies have been arriving in the shop & we've been busy with our monthly workshops.
We've also been organising a special crafting event coming up in May when Visible Image will be joining us with Pauline Butcher for a whole day of crafting.
More info on that in a future post.

Today, I'm sharing the pop up cards we made at our workshops the last two weeks.
We used the pop up die & stamp set to match by Stampendous from WoodWare.
First up is the card I made as a sample followed by my group's creations with their own choice of colours.


So, here are my half of our group's creations, all coloured using distress inks as watercolour paints.


The die cuts all the pop out elements to add your stamped images to. It also has edge cutters & the oval & label style dies to use for the sentiments. 
So, a very handy die set & it proved to be very popular at our workshops this month with me having to reorder die & stamp sets in time to sell for the following weeks class.

The stamp set contains 2 vase stamps, a rose cluster, a daisy stamp, leaf stamp, butterfly & hydrangea cluster.

My group used the rose & daisy stamps, Carole's half of our group used the hydrangea. 
Here's the sample card I made using the hydrangea.


If you hop over to Carole's blog here you will see the cards her half of our craft group made using the hydrangea stamp from this set.

There are also now a few more stamp sets available to go with this die set. I like the look of the Woodland/forest animal set & we hope to have it in stock in the shop very soon.

Some of you already follow Carole's blog so you will know that its nearly 3 years since mum & I asked Carole if she would like to join us to help teach our workshops to help promote our shop Out Of The Blue & the products we sell.

I'm pleased to say our workshops continue to be very popular & many firm friendships have been formed along the way.
We also have new crafters joining us for nearly every workshop & its great when our members come into the shop following a class to let us know how much they have enjoyed creating our projects.

So, enjoy the rest of your weekend, thanks for stopping by & I'll be back soon with more info about our special Visible Image workshop day.

Amy x 


Friday, 10 April 2015

Gone fishing

Happy Friday! 
Hope you all have a fun & crafty weekend lined up?.
I'm working tomorrow & then on Sunday I'll be busy getting things prepared for our workshop on Thursday.

 This evening I'm sharing a card I made as a special commission.

My Dad is a keen fisherman & since retiring in the last couple of years he has spent a lot of time in our local fishing tackle supplies shop (just opposite our own shop) picking up tips & getting to know the owner Chris.

So, when Dad found out it was Chris's birthday last week he asked me to make a fishing themed birthday card for him to give him.


I had just the stamps for the job!.

I used Woodware's 'Gone Fishing' background stamp & 'Casting the bait' stamp.
Plus Creative Expressions 'Tree Bark' A6 stamp by Sam Poole.

The whole card was made using navy, white & black card, black archival ink & faded jeans distress ink, pale blue embossing powder & some screw head metal brads.


I enjoyed making this card as I don't often make men's cards.
Apparently, it was well received & I'm already planning a Father's Day card with a fishing theme to make for my Dad in June.

Thanks for stopping by & leaving me your comments which are always much appreciated, I'll be back again soon.

Amy x 

Friday, 3 April 2015

Easter Greetings

Happy Friday everyone!. 
It's Good Friday too so I hope you all have a lovely Easter bank holiday weekend lined up relaxing, spending time with friends & family & eating lots of yummy Chocolate!?.

My Easter project today features stamps by JOFY from Paperartsy.


I stamped the birds a few times from the JOFY lovebirds mini 20 set & coloured 3 of them with Spectrum noir aqua markers & cut them out along with a mini heart coloured in yellow.

I also used the JOFY collection 13 set, stamped the daisies & buds in black, coloured with promarkers & cut them out.

I stamped the Easter Greetings stamp from Woodware in black ink onto custard yellow card & die cut using a heart die from the Tonic Studios Verso set.
I inked around the edges of the heart with mustard seed distress ink & scribbled around the outside edge with a black fineliner, JOFY style.


Next, I created my background by positioning my daisies & buds onto a duck egg blue piece of card (although in the photos it looks turquoise) to form a heart shape & before they were stuck into place I hand drew stalks & leaves in JOFY style & coloured them with promarkers.

I stuck everything into place after shaping the birds & flowers to add some dimension.

I stamped the mini flowers from collection 13 in peacock feathers, mustard seed & shabby shutters distress inks around the heart garland & added touches of white fresco paint in the centres of the flowers & here & there.


Enjoy the rest of your weekend, I'll be working in the shop tomorrow & then spending time with friends on Sunday & Monday & hopefully doing an Easter Trail if the weather is OK.

Thanks for stopping by
I'll be back soon 

Amy x


Tuesday, 31 March 2015

Easter Gift Bag Workshops.

Hi everyone!. As it's the last day of the month today I thought I'd share with you the project we made at both of our March workshops for Out Of The Blue.
As Easter is almost upon us we thought it would be a nice idea to decorate a gift bag & fill it with some chocolate eggs for our ladies to take home.


First we created a background by inking several colours of distress inks through a spotty mask onto custard coloured card & then inking around the edges. 
The image is a House Mouse stamp from Stampendous featuring Monica mouse asleep on top of a brightly coloured Easter Egg.
Such a cute image & perfect for this project.
Monica was stamped in back archival & coloured using distress inks as watercolours.
The image was die cut using a spellbinder & whilst still in the die I blended peacock feathers for the sky & shabby shutters for the grass.
The flowers were die cut, embossed & inked through the dies using Carnation Creations Spellbinder & the leaves using foliage die.
A double layer of ribbon was attached & a banner tag was made using the Easter Greetings sentiment stamp from Woodware.

The final touch was to add pearl beads to the centres of the flowers & fill the gift bag with tissue & chocolate eggs!.


Here's how my group got on with theirs: 


Some really pretty designs & gorgeous colour combinations chosen!.
Everyone really enjoyed making their Easter Gift Bags & I'm sure whoever they give them to will love them, especially the eggs inside!

Thanks for visiting & for your comments.
I'll be back again soon with another Easter project to share.

Amy x 

Sunday, 15 March 2015

Happy Mother's Day, you're blooming marvellous!

Evening bloggers, I hope you've all enjoyed your weekend. 
For those of you who are Mums, I wish you a Happy Mothering Sunday, hopefully you've been pampered & received gorgeous gifts & cards.

Here's the Mother's Day card I made for my Mum.


It features the Mini Flowers stamp set from Woodware.

This stamp set is very versatile & suitable for many occasions.

Here I have stamped each flower onto white card stock with black archival ink & coloured with a combination of promarkers, the new Spectrum Aqua Pens from Crafter's Companion and a touch of gold cosmic shimmer shimmer paint 
from Creative Expressions.

I cut out each flower & shaped them with my fingers. I snipped into the top right flower to create fronds.

The background was created by embossing a piece of duck egg card stock with  a Creative Expressions mask  inked lightly afterwards with peacock feather distress ink & highlighted with a touch of Treasure Gold gilding wax.


I hand drew the flower stalks directly onto the card with a pigma micron black fineliner.
 The leaves & smallest 'pointy' flower were also hand drawn onto white card stock & coloured with promarkers, cut, shaped & stuck into place with cosmic shimmer dries clear PVA glue.


The 'Happy Mother's Day' banner was stamped onto cream card, inked around the edges with peacock feathers distress inks, mat & layered onto orange card, shaped into a wave with an inverted v & glued top right of the card.


I also lightly decorated the inside of the card too.


Thanks for visiting

I would like to enter this card in the following challenges:


Thanks for visiting & for all your lovely comments as always.

Amy x 

Wednesday, 7 January 2015

The last Christmas wish

The decorations are well & truly down for another year but I just have one more Christmas make to sneek in!.


This is the card I made for my Mother & Father in law & also for my crafty friend Carole who teaches our workshops with us at Out Of The Blue. 

I also made the same card in traditional reds & greens for my Mum & Dad & Auntie & Uncle. 

The poinsettia is a Woodware clear stamp which is really lovely to use as are all of their stamps. 
I stamped in black & coloured with dusty Concorde distress ink as watercolour & cut & layered the flowers together.
 The leaves, berries & die cut flourishes were washed with pine needles. 

The embossed lilac background was enhanced with treasure silver gilding wax as were the edges of the die cut stamped sentiment.


The finishing touch was just to add diamond Stickles glitter glue to the petals & berries to add a bit of sparkle.

Thanks for stopping by

Amy x 


Monday, 29 December 2014

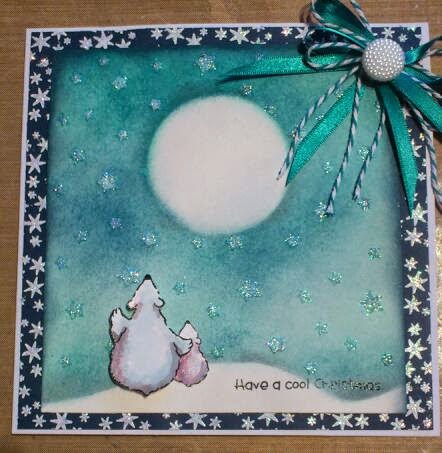
Cool Christmas

Well I hope you've all been enjoying the festivities over the past week?.
It's been a busy time in the shop as you would expect at this time of year & we worked right up until 4 on Christmas Eve.
 So, its been really lovely to have a few days off & enjoy some time with family & friends before we started back today ready for our Winter Sale.

I'm sharing the Christmas card I made for my sister & her boyfriend. She's got a thing about Polar bears & when I saw this stamp from Woodware I just had to have it to make their card.


I cut a circle for the moon & a wavy strip for the snowy hills from cardboard & used these as masks around which I blended distress inks to form the sky background.
I left these in place & then placed the stars stencil from Imagination crafts over the top & spread diamond Sparkle medium also from Imagination crafts through the stencil.
Once dry, I stamped the Cool Christmas sentiment from the Woodware stamp set in the bottom right corner & added my Polar bears that had been coloured with a paintbrush & distress inks.


I created the border by stamping stars with perfect medium & then heat embossed with white detail embossing powder onto navy card.
To finish I added a bow made with ribbon & bakers twine, a pearl button & some crystal stickles glitter glue.


Hope you all have a great New Year & I wish you all a very happy 2015!.

See you again soon

Amy x 

Saturday, 31 May 2014

Hi bloggers!, just wanted to touch base with you all before the month is out.
May has whizzed by & its been a busy time sorting things in the shop ready for our Demo Day next Saturday with the very talented Julia Watts. We're so excited! 

Anyway, last weekend was the bank holiday & oh my goodness, wasn't it a wet & dreary start!.
After working in the shop all day Saturday we joined friends & braved the wet & mud & camped at Beeches Farm near Chepstow.
On Sunday the weather improved & we set off on a walk in our wellies to find Devil's Pulpit & of course we stopped at the pub along the way for a well earned spot of refreshment!

As we lived in our wellies all weekend I thought this card was quite appropriate to show you in this post!
Its a card I made quite a while ago but looking back I don't seem to have posted it before.


I used my Woodware boot stamp & paper pieced the two boots.
I layered them onto some embossed pearlescent red card with a computer typed sentiment & some hearts stamped onto more patterned paper.

Quite an easy card to make.


Anyway, here's a few pics from our walk.

As you can see Nick & Daisy were really enjoying our 'walk'!!
We certainly needed those wellies!

Can't really tell in this pic but it was actually quite a steep incline

The fab view was worth it in the end though!


Hope you enjoy the rest of your weekend & here's hoping the weather improves in June.

See you soon 

Amy x